Visar inlägg med etikett PixInsight Byte. Visa alla inlägg

tisdag 3 januari 2017

Correcting dark lines in dslr astro images

My Pentax DSLR suffers from dark horizontal lines when I photograph bright stars. I'm not sure about the cause of this, but it may be some reverse blooming or ADC related issue. This issue isn't uncommon for digital cameras, but it sure is a nuisance.

Alejandro Tombolini showed in one of his processing examples how to deal with these lines. Here's my adaptation of his process.

I will use the CanonBandingReduction script to correct the lines. This script works only on entire images, and can introduce an uneven background and other artefacts when used on images which do not have bands across the entire width.
I therefore start with making a preview that contains the area I want to correct. I leave some margin, because later on I will clone the preview and shrink the clone.
By dragging the preview onto the workspace, I create a new image, which I apply the CBR script on.
The next step is to make this preview the same size as the original image. For this I use the crop tool.

Set the margins such that the image becomes the correct size, with the corrected image now in the same place as the preview in the original. If the result is ok, the image is saved as xisf file.


Next I shrink the preview in the original image and create a hole in the image where the preview is. For this I use pixelmath.

A new image is created with a black patch where the (smaller) preview was.
This image is also saved.

Finally the two saved images (the corrected preview, and the uncorrected image with the black patch) are merged using GradientMergeMosaic.
And this is the corrected image

söndag 27 november 2016

Removing hot pixels in a stacked image

Sometimes even an aggressive hot pixel filter won't remove all hot pixels. Here's a technique that can remove any residual hot pixels in a final stacked image. I use PixInsight's Morphological Transformation with a starmask to remove these nuisances.
Here's a crop of an image, showing what I'm talking about. The image was taken with a DSLR and consists of a stack of 10 sub frames exposed for 15 minutes each at ISO 800. My camera, a Pentax K20D, is getting old, and I always have lots of hot pixels in my images. Calibration removes most, but frequently a number remain after image integration. The technique which I describe here will dim the remaining pixels.
hot pixels after stacking
I start with making a Luminance copy of the image in its linear state, and apply STF to this grayscale image. Then I use the StarMask tool with a low value for Scale (typically 3 works ok) and a noise threshold of 0.5 (to be experimented with). I decrease large-scale, small-scale and compensation (1, 0, 1) and smoothness (about 6 - 8). Then apply the mask tool to the luminance copy. It may be necessary to tweak the parameters. No stars should be in the "Star-Mask" that is created.
When I'm satisfied, I apply the mask to the original colour image.
For pixel removal I use Morphological Transformation with Morphological Median as operator. Amount to about 0.5, iterations to 4 - 5, and Structuring Element to 9 pixels with a circular pattern.
Apply the tool to the image. If hot pixels of a certain colour remain, I split the RGB channels and use the channel that has the remaining hot pixels to repeat the process. The result is this.
Same crop after hot pixel removal
Further tweaking of the star mask and morphology parameters can improve this result even more, of course.

lördag 3 september 2016

Creating a customized "Batch Process" in PixInsight

Some processes in PixInsight are adapted for large batches of images. But sometimes you want to do a sequence of process steps, for which there is no batch process, on several images. Opening each image and applying a number of processes is quite tedious.
Fortunately, PixInsight has a solution for this. It involves an image container and a process container.
For any process in PI, if you drag the small triangle in the lower left corner to an image, it will apply that process to the image. This can also be applied to a collection of images, if these are in an image container. And the process doesn't have to be a single process, it can be any number of processes that are in a process container. How is this done?

Prepare the process container.

Open an image and apply the processes you want to batch to that and other images.
Now open the image's history explorer, which should be located on the left edge of the workspace. Drag the small triangle at the bottom left to an open area in the workspace. This will create an instance of the process history of that image as a process container in the workspace.
Now you can close the image without saving.

Create an image container

 Next create an image container by right clicking anywhere in the workspace, or press Ctrl+Alt+I.
This will create an image container in the workspace. Open the container and add the image files you want to batch process. Also supply a name for the output directory where you want the processed images to be saved. Finish by dragging the small triangle to an empty spot in the workspace. This will create a new instance of your image container, with all the images in it.
Apply the processes in the process container by simply dragging the process container onto the image container that contains the images.
That's it. You've just applied several process to a batch of images.

onsdag 13 juli 2016

Noise reduction for DSLR astro images


Astro images taken with a DSLR at a high ISO setting are noisy, and the best way to decrease the noise level is of course to take lots of images and stack these. But even then, some sort of noise reduction is necessary.
Noise in DSLR images manifests itself as intensity noise and colour noise. Think of it this way; noise is a random variation in pixel values. Pixel values can either vary in intensity, more or less intensity of the same colour, or in colour, same intensity but another colour. Both these variations have to be addressed by a noise reduction process.
Here I will show you my procedure for DSLR images.
First I apply noise reduction to the luminance or lightness (colour intensity) of the image, and then a very aggresive noise reduction to the chrominance (colour variation).
One of the most efficient luminance noise reduction methods in PixInsight is TGVdenoise. This method is especially good at reducing high frequency (or small scale) intensity noise, and is based on a diffusion algorithm. This means that it detects variation in pixel values and pushes these variation outwards, away from the pixel. As in any diffusion process, the longer you let the process continue, the stronger the spreading process will be. In the case of TGVdenoise this means that you let the process go through many iterations.

One of the best ways to use TGVdenoise was devised by Philippe Bernard. A presentation in french can be found on his website; TGVDenoise. A slightly updated version was presented on the PixInsight forum by member Tromat.
(Always have a  STF stretch applied to the image. This keeps the image in its linear state, but allows you to see on screen what the image looks like. Also, always test the settings on a small preview that contains both background and a weak signal you want to preserve.)


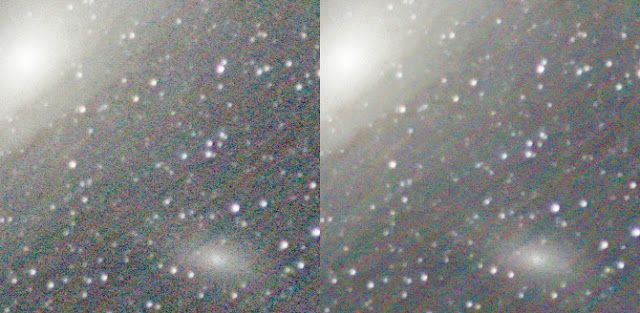
Before and after luminance noise reduction, using TGVdenoise

The second stage of noise reduction is to reduce colour noise, or chrominance noise. For this I use the MultiscaleMedianTransform.
In the noise reduced image, you will probably still see colour variation in the background. MMT will take care of this noise.
First you will need to create a mask that will protect the stars and target.
For this, make sure no mask is applied to your image. Extract a luminance layer (CIE L*) from the image, using the channel extraction process. Apply a histogram stretch to this channel. Make the background as dark as possible, and the stars and target as bright as possible. Don't care if pixels on either end are clipped. Then open the MultiscaleLinearTransform process and set the number of wavelet layers to one. Double click on the first layer to turn it off, and apply the process to the luminance layer. This will blur the image. If you want more blurring, undo the process; set the number of wavelet layers to two and turn both layers off. Then apply again.

Apply the luminance mask to the image and invert it. The target and stars are now masked, while the background is revealed for noise reduction.
Open the MultiscaleMedianTransform process and choose 7 wavelet layers. Set the mode to Chrominance (Restore CIE Y).
Enable noise reduction on only the first layer. Set strength to 5 and leave the other parameters as they are. Apply to a small preview.
You should see a lot of the small scale noise dissapear, but there is still a lot coarser noise left.
Increase the strength parameter to 7 and apply to the preview. Better? If you still want more noise reduction, increase strength to 10 and apply.
If you are satisfied, do the same for wavelet layer number 2.
Generally, you will need most noise reduction on the first layer (fine, single pixel scale detail), and less on higher number layers. Just test one layer at a time, until you are satisfied.
Then apply to the entire image.

MMT takes a while to run for the first time, but you will notice that it is much faster after this first time. This is because the process needs to calculate the wavelet layers. As long as you do not change the number of wavelet layers, it only does this once. The process is independent of preview size. This also means that once you've found the best settings, the process is very fast on the whole image.
Don't forget to remove the mask once you're done.
Here's a before and after image.

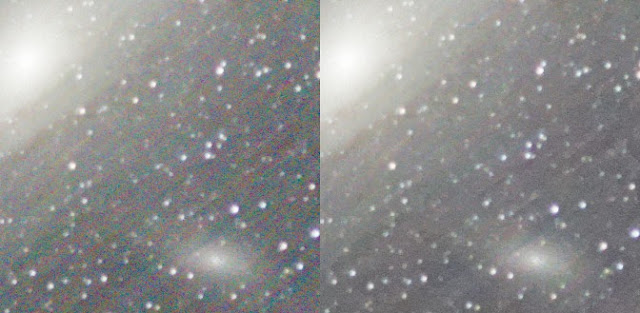
Before and after chrominance noise reduction, using MMT

Tip: don't delete masks, because that will break the links in the process history. Just minimise them and move to one side.
Note that in the example image, the streaks are created by residual hot pixels during the stacking process. Dithering will eliminate this effect.

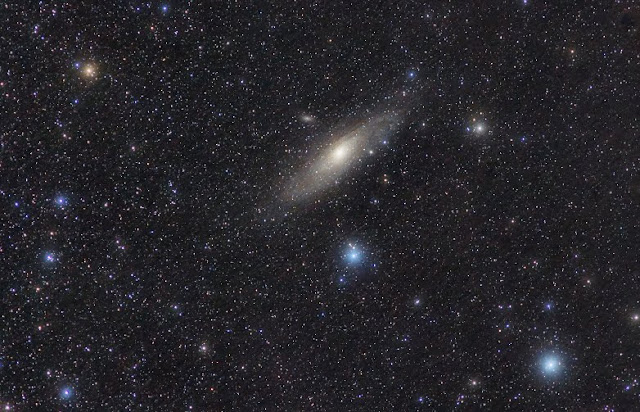
BTW, here's the final image.