If you want to reduce stars in PixInsight, you need a contour star mask. The StarMask process has this option, and for many images this works just fine. But occasionally I find it difficult to make this mask work for both large and medium sized stars. Here's an alternative to the standard method.
Use StarMask to create a standard star mask. Choose the number of layers large enough to include even large stars. To get this to work, you may need to decrease the noise threshold a bit. On most of my images, I start with 6 or 7 for the number of layers, and about 0.35 for the noise threshold. But really it depends entirely on your image and what size stars you have. Keep the structure parameters at their default values (Large = 2, Small = 1, Compensation = 2)
When you're satisfied with the mask, create another one, but decrease the number of layers by one, and set the structure parameters to 0.
Now, use PixelMath to subtract the second mask from the first. If you want to keep the original masks, create a new image. Otherwise use the expression '$T - star_mask2' and apply it to the first mask (with the larger stars). The star mask should now show donuts for stars. If the donuts don't open up (ie still gray or white in the center), you need to increase the intensity of the second mask by using the HistogramTransformation tool. Occasionaly, I have had to use the CloneStamp tool for a tricky star or two. Just take a sample from the black background and clone it in the white star that is reluctant to open up. Just make sure you put it in the right spot, otherwise you may end up with a lopsided star.
When you are satisfied with the contour shapes, you can increase the intensity of the mask with the HistogramTransformation tool, and blur the mask with the Convolution tool.
The advantage of this method is that it creates contour masks for large and small stars alike, while the standard method, sometimes fails to create contours for smaller stars.
Visar inlägg med etikett PixelMath. Visa alla inlägg
Visar inlägg med etikett PixelMath. Visa alla inlägg
söndag 4 juni 2017
tisdag 3 januari 2017
Correcting dark lines in dslr astro images
My Pentax DSLR suffers from dark horizontal lines when I photograph bright stars. I'm not sure about the cause of this, but it may be some reverse blooming or ADC related issue. This issue isn't uncommon for digital cameras, but it sure is a nuisance.

Alejandro Tombolini showed in one of his processing examples how to deal with these lines. Here's my adaptation of his process.

I will use the CanonBandingReduction script to correct the lines. This script works only on entire images, and can introduce an uneven background and other artefacts when used on images which do not have bands across the entire width.
I therefore start with making a preview that contains the area I want to correct. I leave some margin, because later on I will clone the preview and shrink the clone.
By dragging the preview onto the workspace, I create a new image, which I apply the CBR script on.
The next step is to make this preview the same size as the original image. For this I use the crop tool.

Set the margins such that the image becomes the correct size, with the corrected image now in the same place as the preview in the original. If the result is ok, the image is saved as xisf file.

Next I shrink the preview in the original image and create a hole in the image where the preview is. For this I use pixelmath.

A new image is created with a black patch where the (smaller) preview was.
This image is also saved.

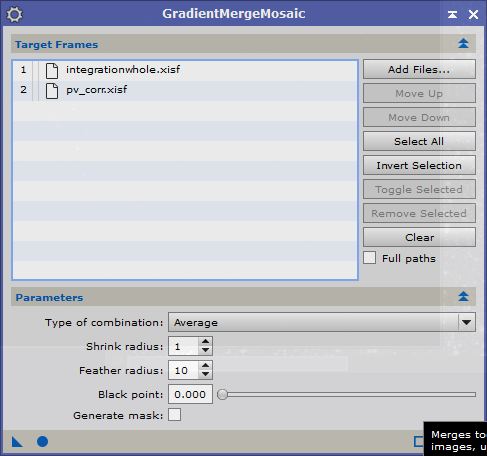
Finally the two saved images (the corrected preview, and the uncorrected image with the black patch) are merged using GradientMergeMosaic.
 And this is the corrected image

Alejandro Tombolini showed in one of his processing examples how to deal with these lines. Here's my adaptation of his process.

I will use the CanonBandingReduction script to correct the lines. This script works only on entire images, and can introduce an uneven background and other artefacts when used on images which do not have bands across the entire width.
I therefore start with making a preview that contains the area I want to correct. I leave some margin, because later on I will clone the preview and shrink the clone.
By dragging the preview onto the workspace, I create a new image, which I apply the CBR script on.
The next step is to make this preview the same size as the original image. For this I use the crop tool.

Set the margins such that the image becomes the correct size, with the corrected image now in the same place as the preview in the original. If the result is ok, the image is saved as xisf file.

Next I shrink the preview in the original image and create a hole in the image where the preview is. For this I use pixelmath.
A new image is created with a black patch where the (smaller) preview was.
This image is also saved.

Finally the two saved images (the corrected preview, and the uncorrected image with the black patch) are merged using GradientMergeMosaic.

Prenumerera på:
Inlägg (Atom)